• Blog Home
  • NauticEd Sailing School
  • NauticEd on Facebook
  • NauticEd sailing videos
KEEP IN TOUCH

Posts tagged sailing courses

Learn to Sail Series: How to Reef the Headsails

Jun12
2011
Written by Grant Headifen

This is a continuing  learning how to sail article on Reefing the Sails. This has been written by Grant Headifen of NauticEd Sailing School.

In the last Learn to Sail article on reefing we convinced you pretty hard on why you should reef the sails. So now let’s first learn how to reef the headsails.

The five most common sails on a sailboat are mainsail, jibsail, genoa, spinaker and genaker.

We’ll deal with the spinnaker and genaker first in regards to reefing because it’s pretty simple. Take them down and replace with a smaller one if available or take down entirely. Don’t push the limits with these sails. They are made of very fine and fragile fabric because they need to be light. If you over power these sails they will tear. Even if they don’t tear, one slight misjudgment or distraction when flying these in high winds can lead to a broach and broaches are bad.

A broach is when the wind force slams the boat over sideways, you loose control, the boat tries rounds up but the wind continues to fill the sail and hold the boat down – potentially capsizing it. It’s the last thing you want to do as you learn to sail because you probably don’t have the experience to get out of this situation other than swimming. You’ll most often see this in yacht club regatta racing when a captain is reluctant to reduce sail area because he wants to win the race. Experienced skippers know to NOT put a stopper knot in any of the working lines of a spinnaker or genaker. If you broach, you will need to dump these lines completely out of any blocks or fairleads that guide these lines with in seconds or face potential capsize.

The next sail set to discuss is the jibsail and the genoa. Or they can correctly be referred to as the head sail in both circumstances. These two sails are essentially the same except by definition. A headsail is a genoa if the clew (bottom aft eyelet) extends aft past the mast. A head sail is a jibsail if the clew does not extend past the mast.  People refer to a jib or genoa size by the percentage of distance from the forestay to the mast. If the Genoa extends past by 10% then it is called a 110 genoa. If a jibsail extends only 90% of the distance from the forestay to the mast then it is called a 90 jibsail.

Some jibsails and genoas are raised and lowered and some roll up (furl) around the forestay. If they are furled around the forestay then it is very simple to reef them. You simply roll them up a little in order to decrease their size. Typically there will be two stripes marked on the foot of the jib/genoa. Each one marks where the sail should be rolled to for the respective reefing point.

There is a safety and rigging protecting method that is VERY important to note when reefing a roller furling sail. It’s a classic mistake that is commonly made when you learn to sail because you’re not familiar with the rigging and their forces. The point is simple, you must tighten the sail after reefing with the jibsheet. Don’t use the inhaul to tighten the sail. A roller furling jibsail/genoa has a drum at the bottom of the forestay. This rolls up by pulling on the inhaul line and rolls out by pulling on the jibsheet. The inhaul is a line that runs back to the cockpit. You pull the inhaul to wind it up while managing the slow release of the jib sheets.

To unwind the head sail you will release the inhaul line and lay it out so that it will uncoil smoothly with out getting caught in the inhaul clutch or cleat. Then pull the leeward (downwind) jibsheet all the time ensuring the smooth uncoiling of the inhaul, plus keeping a watch out on traffic and crew etc.

When you are reefing a roller furling headsail, slowly let out the jibsheet while heading the boat slightly to wind to slacken the jibsheet. Roll up the sail the desired amount making sure that the jibsheet always has some slack to it. Then tighten the headsail back up with the jibsheet only. Do not cleat off the jibsheet and tighten the sail by further hauling in on the inhaul. This will certainly damage the drum and furling system.

For additional safety, do not completely let go the jibsheets then begin winding the inhaul. This causes the jibsheets to whip wildly and, from experience, they really REALLY hurt. Control the jibsheet tension at all times. Controlling the jibsheet tension also ensures a firmly wound headsail.

When you want to let out a reef in the headsail, first wrap the inhaul around a winch two to four times depending on the wind strength. Then release the inhaul clutch/cleat and control the let out of the inhaul. Once it is at the point you want it or it’s all the way out, cleat the inhaul and tighten up on the jibsheet.

If the headsails are not of the furling type then you will most likely hank (clip) them onto the forestay and then raise the sail with the jib halyard. In this case there is no way to furl or reef that sail. Reefing the headsail then means removing the current headsail and raising a smaller one. It’s not that difficult but you have to be aware of whipping lines and inherent dangers of being on the bow in rough and rolling seas with waves potentially breaking over the foredeck. Under poor weather conditions, the prudent sailor will be clipped into jacklines with a harness. Jacklines are safety lines that run on the deck from forward to aft. A crew member can clip in and walk to the foredeck and back whilst all the time being attached to the sailboat.

As you learn to sail, we sincerely hope that you take note of this sail reefing series as it is very important to your crew, yourself and your vessel. This article is not the be all and end all. You absolutely should get out sailing with a knowledgeable friend or instructor from a NauticEd Affiliated sailing school on a boat and practice reefing under various weather conditions.

This learn to sail article was written by Grant Headifen, Educational Director of NauticEd. NauticEd is an online sailing school providing sailing courses and sailing certifications for beginner to advanced sailors worldwide.

NauticEd Sailing Certifications are accepted by most large yacht charter companies including The Moorings, Sunsail, Kiriacoulis, BVI Yacht Charters, Sailing New Zealand, Gulf Charters Thailand.
Posted in Learn to Sail - Tagged how to reefing the sails, Learn to sail, sailing school

Learn to Sail Series – Reefing the Sails – why?

May10
2011
Written by Grant Headifen

This is another Learn to Sail Artical is a series on the sails. The articels are written by Grant Headifen, Educational Director for NauticEd Sailing School. NauticEd is the World’s Most Advanced Online Sailing Education and Sailing Certification Company.

Reefing the sails is such and important safety aspect of sailing that it’s one of the first things you should understand as you begin to learn to sail.

Now is a good time to discuss something a tiny bit technical – force from the wind. Force imparted onto the sailboat is multiplied by four every time the wind speed doubles.

So if you go from 5 knots to 10 knots the forces quadruple. Then if you again go up to 20 knots, the forces are 16 times higher than at 5 knots. And 40 knots? 64 times. To put that in more perspective if it takes about ½ your strength to pull a line at 5 knots, at 20 knots you would feel 8 hefty guys pulling against you in a tug of war. You’ve got no chance. Now also think of the stress on the rigging and how 16 times more force aloft is heeling your boat over. Sixteen times!!!!

I hope you’re getting the point.  The quadrupling effect comes from the well established Bernoulli’s equation which says the pressure applied is proportional to the square of the velocity. And by definition, force is equal to pressure multiplied by area.

So if we halve the area we halve the forces. Makes sense right? And that is what we are doing by reefing. We’re reducing the area while the velocity is increasing in our best attempt to manage the forces.

And one more thing – when you’re heading up wind, your boat speed is somewhat additive to the wind speed and so the forces increase even further.

The mast on your sailboat is probably supported by shroud lines attached to the sides of your sailboat and by a forestay and aftstay. They are designed to hold certain forces aloft. Should the forces become higher than design or the connections deteriorate which on a boat they are guaranteed to do over time, then you’re going to have some serious problems with a dismasting.

In reality and practice, you should start to think about reefing the sails at about 12 knots of wind. At 15 knots, you should definitely be reefing and at 20 knots, you’re crazy if you don’t have 1 or 2 reefs in. The boat will be uncontrollable if you haven’t reefed and you’ll be probably breaking items on your boat due to high forces from the wind. At 30 knots, the boat will probably explode. Well, not quite, but I’m making a point to reef reef reef and get comfortable with the process especially when you are starting out in your learn to sail quest. And get a sailing school instructor or practiced sailing friend to teach you how to reef your sails.

The process should not be intimidating. What can be intimidating however is if you leave it too late. A good professional captain of mine who would sail across the Atlantic had a saying. If you think you should be reefing – you should have reefed yesterday and if you are thinking about “shaking out the reef” (unreefing (if that is a word)) wait until tomorrow.

Leaving the reefing until it is too late means that there are excess forces already on all of the lines you’re going to want to be handling which is a safety issue for you and your crew. So reef early. An additional incentive to reefing is that actually, you can make your boat go faster anyway.  So if you’re trying to be mucho and waiting to reef, you will be going slower and loosing the race (there is always a race).

Not reefing causes rounding up. One of the best things to see in a race is when the boat that is ahead of you has too much sail aloft and they get over powered and round up into the wind. This is so awesome because in doing so they will have lost 50 meters of lead on you.

Rounding up is a wee bit technical but essentially it is when the wind force takes over your boat with out your ability to counter act using the rudder. The boat just turns up into the wind. It’s dangerous because you can be turned right into other traffic. And it’s just a pure waste of good sailing.

When you begin to learn to sail, you’ll find that the boat is trimmed so that the rudder balances the turning force of the sails. The force from sails want to turn the boat up into the wind and the force from the rudder wants to turn the boat down wind. This is done for two reasons. (1) For safety: if the tiller or wheel is released the boat will round up into the wind and loose  power. And (2) if the rudder is pointing slightly up wind the boat gets a lift to windward from the force of the water on the rudder.  However this balance is lost as the boat heels over too much. If you imagine that the boat has heeled over 30 degrees then according to Pythagoras, you are down to 70.7% of your rudder counteracting forces. So too much heeling is bad.

On top of all that, as you begin to learn to sail and understand the forces, you’ll learn that the sail relies on efficiency of the wind over the sail to create lift. This requires that the wind on the back side of the sail flow evenly across the sail (stays attached to the sail) to create the low pressure and thus lift. When the wind speed is too high and as the boat heels over, the wind has great difficulty in staying attached to the sail. Thus the wind peels off and you loose efficiency. A smaller sail requires the wind to stay attached for a shorter distance and thus increases the efficiency.

We sum all this up to say when you reef in high wind conditions your boat can go faster with less heeling and less likelihood of doing serious damage to your sailboat. That’s good.

In the next learn to sail series we’ll cover how to reef the sails.

This article was written by Grant Headifen, Educational Director of NauticEd. NauticEd is an online sailing school providing sailing courses and sailing certifications for beginner to advanced sailors.

Posted in Learn to Sail - Tagged Learn to sail, sailing school

Learn to Sail Series and The Mainsail Basics

May04
2011
Written by Grant Headifen

In this NauticEd Sailing School learn to sail article we’re going to discuss the mainsail and some “thingys” that are attached to it and the function of those thingys.

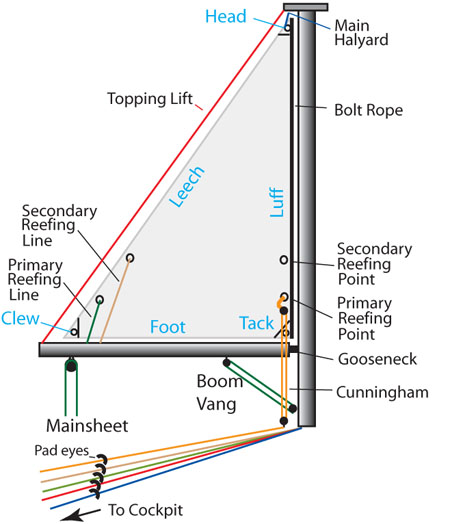
The mainsail is literally “the Main Sail”. Every sailboat has a mainsail and it’s usually a triangular shape. It’s the one that is hoisted (pulled) up the mast and extends aft (towards the stern (rear) of the boat). The foot (bottom) of the mainsail is usually attached to the boom. The boom is a rigid horizontal spar that attaches to a position near the base of the mast and extends backwards towards the aft of the sailboat. The front bottom connection part of the mainsail is called the tack. It’s a very strong sewn in eye hole. Similarly the back bottom connection eye hole in the mainsail is called the clew. The foot of the sail usually slides into a track along the boom and is held taught along the boom by a line called the out haul attached to the clew by a D-ring. In some cases the foot of the mainsail is only attached to the tack and the clew. The attachment fitting which attaches the boom to the mast is called a gooseneck which allows the boom and thus the mainsail to swing from side to side. The leech (trailing edge) of the sail holds up the back of boom. On larger boats (20ft plus), when the mainsail is not hoisted there is a line from the top of the mast to the back of the boom called the boom topping lift. The boom topping lift holds up the back of the boom. However, as soon as the mainsail is hoisted, the boom topping lift line should become slack allowing the sail tension to take over this roll.

The leading edge of the mainsail is called the luff. It attaches to the mast in a few different ways. Sometimes there is a rope sewn into the luff. This rope is called a bolt rope and is one of the few ropes that exist on a boat. Another is called a bell rope  although some sailors will claim there are no ropes on a boat. The bolt rope slides up into a track on the mast holding the mainsail securely in place. With other mainsail luffs, there are clips called hanks which are sewn into the leading edge approximately 30 cm apart. The hanks then slide into a track as the mainsail is hoisted.

The Main Sail

The Main Sail

The line that hoists the mainsail up to the top of the mast is called a halyard. It is held to the top (head) of the mainsail by a D-ring, goes over a sheave (pulley) at the top of the mast and then down the mast to either a winch on the mast or through a few blocks and back to a winch near the cockpit.

Once we have the sail up. We’ll want to begin controlling the sail and adjusting to the wind. This is the most fun part of your learn to sail desire. To control how far the boom and thus mainsail swings out, we use the main sheet. Just remember that on a sailboat, sheets are lines which are ropes. The main sheet attaches to a block (pulley) near the back of the boom and down to the to center of the sailboat, usually in the cockpit. When we pull on the mainsheet the boom is pulled down and swings towards the center of the boat. When we let out the mainsheet the mainsail can swing out and is also allowed to rise up. Pulling in the mainsheet is called “tightening up the mainsheet” and letting out the mainsheet is called “easing the mainsheet” or “letting out the mainsheet”. Notice that we always refer to the line by name that we are adjusting so that there is no ambiguity.

There are a few other controlling lines of the mainsail which we’ll discuss in the next article. Even though you probably feel like you’re starting out with a test of some foreign language, understanding the names and functions of the mainsail is all part of the learn to sail routine.

For a free sailing course about sail trim, go to http://www.nauticed.org/freesailingcourse

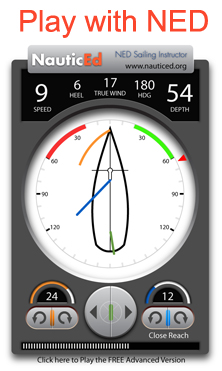
To get some practice with trimming the sails go to our interactive sailing instructor at http://www.nauticed.org/sailing-instructor

NED the Sailing Instructor

Learn to Sail with NED

This learn to sail article was written by Grant Headifen, Educational Director of NauticEd. NauticEd is an online sailing school providing sailing courses and sailing certifications for beginner to advanced sailors.

Posted in Learn to Sail - Tagged Learn to sail, mainsail, sailing school

NauticEd Videos

Learn to Sail with NauticEd

Recent Articles

  • Weather Helm Vs Lee Helm – What is it? How to use it?
  • Trimming the Mainsail and Preventing Rounding Up
  • Learn to Sail Series: How to Reef the Headsails
  • Learn to Sail Series: How to Reef the Mainsail
  • Learn to Sail Series – Reefing the Sails – why?

Keywords

how to reef how to reefing the sails Learn to sail mainsail reefing the mainsail sailing certification sailing course sailing courses sailing school what is lee helm what is weather helm

Social Signin

Log in with

Categories

  • Learn to Sail

EvoLve theme by Theme4Press  •  Powered by WordPress NauticEd Sailing School
21st century sailing education

close