• Blog Home
  • NauticEd Sailing School
  • NauticEd on Facebook
  • NauticEd sailing videos
KEEP IN TOUCH

Posts tagged Learn to sail

Learn to Sail Series and The Mainsail Basics

May04
2011
Written by Grant Headifen

In this NauticEd Sailing School learn to sail article we’re going to discuss the mainsail and some “thingys” that are attached to it and the function of those thingys.

The mainsail is literally “the Main Sail”. Every sailboat has a mainsail and it’s usually a triangular shape. It’s the one that is hoisted (pulled) up the mast and extends aft (towards the stern (rear) of the boat). The foot (bottom) of the mainsail is usually attached to the boom. The boom is a rigid horizontal spar that attaches to a position near the base of the mast and extends backwards towards the aft of the sailboat. The front bottom connection part of the mainsail is called the tack. It’s a very strong sewn in eye hole. Similarly the back bottom connection eye hole in the mainsail is called the clew. The foot of the sail usually slides into a track along the boom and is held taught along the boom by a line called the out haul attached to the clew by a D-ring. In some cases the foot of the mainsail is only attached to the tack and the clew. The attachment fitting which attaches the boom to the mast is called a gooseneck which allows the boom and thus the mainsail to swing from side to side. The leech (trailing edge) of the sail holds up the back of boom. On larger boats (20ft plus), when the mainsail is not hoisted there is a line from the top of the mast to the back of the boom called the boom topping lift. The boom topping lift holds up the back of the boom. However, as soon as the mainsail is hoisted, the boom topping lift line should become slack allowing the sail tension to take over this roll.

The leading edge of the mainsail is called the luff. It attaches to the mast in a few different ways. Sometimes there is a rope sewn into the luff. This rope is called a bolt rope and is one of the few ropes that exist on a boat. Another is called a bell rope  although some sailors will claim there are no ropes on a boat. The bolt rope slides up into a track on the mast holding the mainsail securely in place. With other mainsail luffs, there are clips called hanks which are sewn into the leading edge approximately 30 cm apart. The hanks then slide into a track as the mainsail is hoisted.
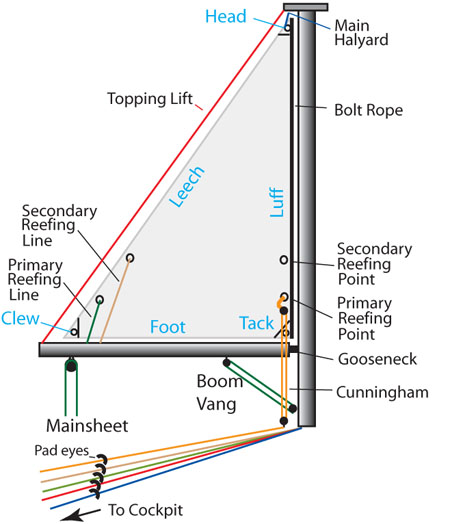
The Main Sail

The Main Sail

The line that hoists the mainsail up to the top of the mast is called a halyard. It is held to the top (head) of the mainsail by a D-ring, goes over a sheave (pulley) at the top of the mast and then down the mast to either a winch on the mast or through a few blocks and back to a winch near the cockpit.

Once we have the sail up. We’ll want to begin controlling the sail and adjusting to the wind. This is the most fun part of your learn to sail desire. To control how far the boom and thus mainsail swings out, we use the main sheet. Just remember that on a sailboat, sheets are lines which are ropes. The main sheet attaches to a block (pulley) near the back of the boom and down to the to center of the sailboat, usually in the cockpit. When we pull on the mainsheet the boom is pulled down and swings towards the center of the boat. When we let out the mainsheet the mainsail can swing out and is also allowed to rise up. Pulling in the mainsheet is called “tightening up the mainsheet” and letting out the mainsheet is called “easing the mainsheet” or “letting out the mainsheet”. Notice that we always refer to the line by name that we are adjusting so that there is no ambiguity.

There are a few other controlling lines of the mainsail which we’ll discuss in the next article. Even though you probably feel like you’re starting out with a test of some foreign language, understanding the names and functions of the mainsail is all part of the learn to sail routine.

For a free sailing course about sail trim, go to http://www.nauticed.org/freesailingcourse

To get some practice with trimming the sails go to our interactive sailing instructor at http://www.nauticed.org/sailing-instructor
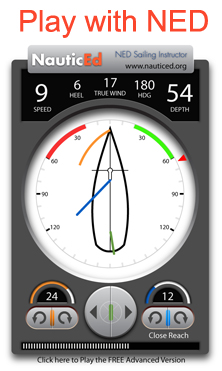
NED the Sailing Instructor

Learn to Sail with NED

This learn to sail article was written by Grant Headifen, Educational Director of NauticEd. NauticEd is an online sailing school providing sailing courses and sailing certifications for beginner to advanced sailors.

Posted in Learn to Sail - Tagged mainsail, sailing courses, sailing school

Learn to Sail Series – The Jib and Genoa

May04
2011
Written by Grant Headifen

In this learn to sail series article we’ll discuss the jibsail and the genoa, how they are used and their approximate set for the wind angle.

Both the jib and the genoa can also accurately be referred to as the headsail because it is at the head (bow (front)) of the sailboat. It is called a jib when the foot of the headsail is shorter than the distance from the base of the forestay to the mast. It is called a genoa when the foot of the headsail is longer than the distance from the forestay to the mast. As with the mainsail, you can use the head sails at all points of sail from close haul (usually about 30-40 degrees off from where the wind is coming from) to a downwind run. Headsails are also referred to by number. A number one head sail would mean the largest genoa onboard the vessel. You might also hear a number like 130 headsail which means that the foot is 130% greater that the mast to forestay base  distance.

So as you learn to sail, you’ll find the head sail is relatively easy to operate. The main controls are the two jibsheets. One on each side of the boat. The jibsheet that is on the leeward (downwind) side of the boat is referred to as the working jib because it is tensioned up. The windward jibsheet is referred to as the lazy jibsheet because it is not being used and is left loose. Many new sailors just learning to sail try to pull the lazy sheet tight, partly because it seems unnatural to have a line on a sailboat that is slack. The best position for a lazy sheet to be in is slack but ready to be tensioned by being wrapped around the winch in a clockwise direction one or two times.

Another line attached to the headsail is the halyard. The halyard is the line used solely for hoisting and lowering the headsail. Even if the headsail is a roller furling headsail, it will still have a halyard to hoist it up.

One function of the head sail, which is not obvious to novices as they learn to sail, is that the head sail feeds extra wind to the back side (downwind side) of the mainsail. This provides extra lift function from the increased velocity of the wind being diverted by the head sail. This is explained more in our article which explains how sails actually work.

The set of the headsail should follow the set of the mainsail. As you learn to sail more and more you’ll be able to expertly set the headsail according to the telltales mounted close to the leading edge of the headsail. However, for now, just set it according to how far away from the wind direction you are headed and according to this golden rule: Let the working headsail sheet out until you see the leading edge of the sail begin to fold in on itself then tighten the sheet up a little.

This is actually a fairly accurate way of doing it and you’ll notice that the more away from the wind you steer, the more you will need to let out the headsail sheet. And in doing so, you’ll notice that it is mimicking the set of the mainsail discussed in another article in this series.

On a close haul, which is when the sailboat is steering 30-40 degrees off from the direction of the wind, the best position of the headsail is cranked in tight so that the sail is about 4-6 inches (10 -15 cm) away from the spreader bars on the mast. To some this may seem overly tight and it takes a lot of strength to get the sail in this tight. But alas, this is what will be required to stop the leading edge from folding in on itself.

Headsails vary in size and are hoisted according to the wind conditions. As a general rule, you’d use a 150 genoa in winds up to about 10 knots. A 130 genoa to about 12 knots. A 110 genoa to about 15 knots. A 90 Jib at 20 knots. A 70 jib at 25 knots. A 50 jib at 30 knots. And a storm jibsail anything above 30 knots.

Headsails are either of roller furling type which are becoming more common, or are hanked on by clips to the forestay and raised and lowered each time. Roller furling head sails can not have horizontal battens which help control the airfoil shape of the sail. However some newer design roller furling headsails incorporate vertical battens which aids the shape.

Raise and lower hanked on headsails are reefed by replacing the sail out with a smaller sail this takes time and some serious effort. Roller furling headsails are simply wound up to reduce the size of the sail. This however does create a large leading edge to the headsail which decreases the effectiveness of the sail due to spoiled wind at the leading edge.

We’ll discuss the physics of how the headsail provides forward motion to the sailboat in a follow on article.

For those just learning to sail, NauticEd has put together a free online basic sail trim sailing course.

This learn to sail series is written by Grant Headifen, Educational Director of NauticEd. NauticEd is an online sailing school providing sailing education and sailing certifications to beginner through advanced sailors.

Posted in Learn to Sail - Tagged sailing course, sailing school

Learn to Sail Series – The Mainsail

May02
2011
Written by Grant Headifen

This Learn to Sail article was written by NauticEd – the World’s Most Technologically Advanced Sailing School.

On a sailboat, there are 5 common sails that are used. The mainsail, the jib sail, the genoa, the spinnaker and the genaker.

In this learn to sail series article we’ll discuss the mainsail, how it is used and its approximate set for the wind angle.

The mainsail is literally “the main sail”. You can use the main sail at all points of sail from close haul (usually about 30-40 degrees off from where the wind is coming from) to a downwind run. It’s a big sail although some offshore sailboats and racing sailboats carry with them different size mains for different wind conditions. The largest mainsail on board is referred to as the number 1 mainsail.

So as you learn to sail, the main sail is the most common sail that you will be using. It’s typically a triangle shape angling down towards the stern of the boat from the top of the mast. Some mainsails have a “roach”. A roach is when the mainsail leech (trailing edge of the sail) has a curve to it. This makes the area aloft greater, giving the boat more power. Horizontal battens hold the sail shape, and are especially needed when the sail has a roach. Mainsails that roll up into the mast can not have horizontal battens however because they will not roll up. Some sailmakers have compensated by sewing in to the mainsail vertical battens. This allows the sail to be furled (rolled up) while maintaining the ability to give an airfoil shape to the sail.

The Main Sail

The Main Sail

With out going into the details in this article of how the wind drives the sails we’ll rather describe the sail set simplistically so that as you begin to learn to sail you can get the boat moving.

  • When you’re heading on a close haul, 30-40 degrees away from the direction of origin of wind, you should have the mainsail set to about 10 degrees off the center line of the sailboat.
  • On a close reach (50 – 70 degrees) set the mainsail about 40 degrees off the centerline of the sailboat.
  • On a reach (80- 100 degrees) set the mainsail at about 60 degrees.
  • On a broad reach (110 – 140 degrees) set the mainsail at about 70 degrees but also ensure that the mainsail is not resting too heavily on the spreader bars (cross bars mounted up on the mast).
  • On a run (150 – 180 degrees) set the mainsail at about 85 degrees and as above ensure that the mainsail is not resting too heavily on the spreader bars (cross bars mounted up on the mast).
NED the Sailing Instructor

Learn to Sail with NED

NauticEd has a really great learn to sail interactive tool to help people work with the sail angles according to the direction of the wind. It’s an online sailing Instructor called NED.

Visit NED at http://www.nauticed.org/sailing-instructor

The above is a really great learn to sail rule of thumb and will mostly keep you out of the confusion zone. In a follow on article we’ll give you the physics of it all but not now.

Another minor use of the mainsail worthy of note however is that it can prevent side to side roll of the sailboat when motoring through rolling seas. When motoring into the wind, just raise the mainsail and tighten up the mainsheet so that the boom does not swing. The air resistance from the sail prevents the rolling and gives a much more comfortable motoring experience.

So there you have it. You now know a little about the mainsail and a little about how to set it.

This learn to sail series is written by Grant Headifen, Educational Director of NauticEd. NauticEd is an online sailing school providing sailing education and sailing certifications to beginner through advanced sailors.

For more info see http://www.nauticed.org where you can learn to sail with the best.


Posted in Learn to Sail - Tagged sailing school
Newer Entries »

NauticEd Videos

Learn to Sail with NauticEd

Recent Articles

  • Weather Helm Vs Lee Helm – What is it? How to use it?
  • Trimming the Mainsail and Preventing Rounding Up
  • Learn to Sail Series: How to Reef the Headsails
  • Learn to Sail Series: How to Reef the Mainsail
  • Learn to Sail Series – Reefing the Sails – why?

Keywords

how to reef how to reefing the sails Learn to sail mainsail reefing the mainsail sailing certification sailing course sailing courses sailing school what is lee helm what is weather helm

Social Signin

Log in with

Categories

  • Learn to Sail

EvoLve theme by Theme4Press  •  Powered by WordPress NauticEd Sailing School
21st century sailing education

close